How To Make A Bow Out Of Wrapping Paper - Step By Step Guide
There's nothing quite like the frustration of wrapping a present only to realize you've run out of bows. Whether it's last-minute gift wrapping or simply wanting to add a personal touch, creating your own bows from wrapping paper can save the day. Wrapping paper bows not only match your gift perfectly but also bring a unique flair to your presentation. In this guide, we’ll walk through simple steps to craft beautiful bows without breaking the bank. From fluffy bows to classic gift wrap bows, you’ll find everything you need to know.
Learning how to make a bow out of wrapping paper is easier than you might think. With just a few scraps of leftover wrapping paper, you can create bows that look as good as store-bought ones. Plus, it's a fun and creative activity that adds a handmade charm to your gifts. So, let's get started and turn those leftover scraps into something beautiful.
Wrapping paper bows are versatile and can be adapted to fit any occasion. Whether you're decorating for a birthday, holiday, or even a special event, these bows will enhance the look of your gifts. In the sections below, we'll explore different techniques, tips, and tricks to help you master the art of making bows from wrapping paper. Let's dive in!
Table of Contents
- How to Make a Bow?
- What Kind of Paper Should I Use?
- Can I Make Different Styles of Bows?
- How to Make a Bow Out of Wrapping Paper?
- What Tools Do I Need?
- What Are Some Tips for Making Bows?
- What Are Common Mistakes to Avoid?
- Final Thoughts
How to Make a Bow?
So, you're wondering how to make a bow. It’s not as complicated as it seems. In fact, it’s a pretty straightforward process that requires just a bit of creativity and patience. To start, think about the type of bow you want to create. Do you prefer a fluffy bow, a classic bow, or maybe something more intricate like a bow tie? Each style has its own charm and can be adapted based on the occasion.
For example, if you’re wrapping a birthday present, you might want a bow that’s bright and playful. On the other hand, if it’s a formal event, you might lean towards something more elegant and sophisticated. Either way, the process remains similar. Just a little tweaking here and there can make all the difference.
What Kind of Paper Should I Use?
Choosing the right paper is crucial when learning how to make a bow out of wrapping paper. Thicker paper tends to hold its shape better and is less likely to crumple. This means your bow will look neater and more polished. Regular wrapping paper works well, but if you have access to scrapbooking paper or even cardstock, those are great options too.
By the way, don’t forget about recycled materials! Old magazines, book pages, or even leftover gift wrap can be repurposed into beautiful bows. It’s a fantastic way to reduce waste and add a personal touch to your gifts. Sometimes, the unexpected combinations of colors and patterns can create truly unique bows.
Can I Make Different Styles of Bows?
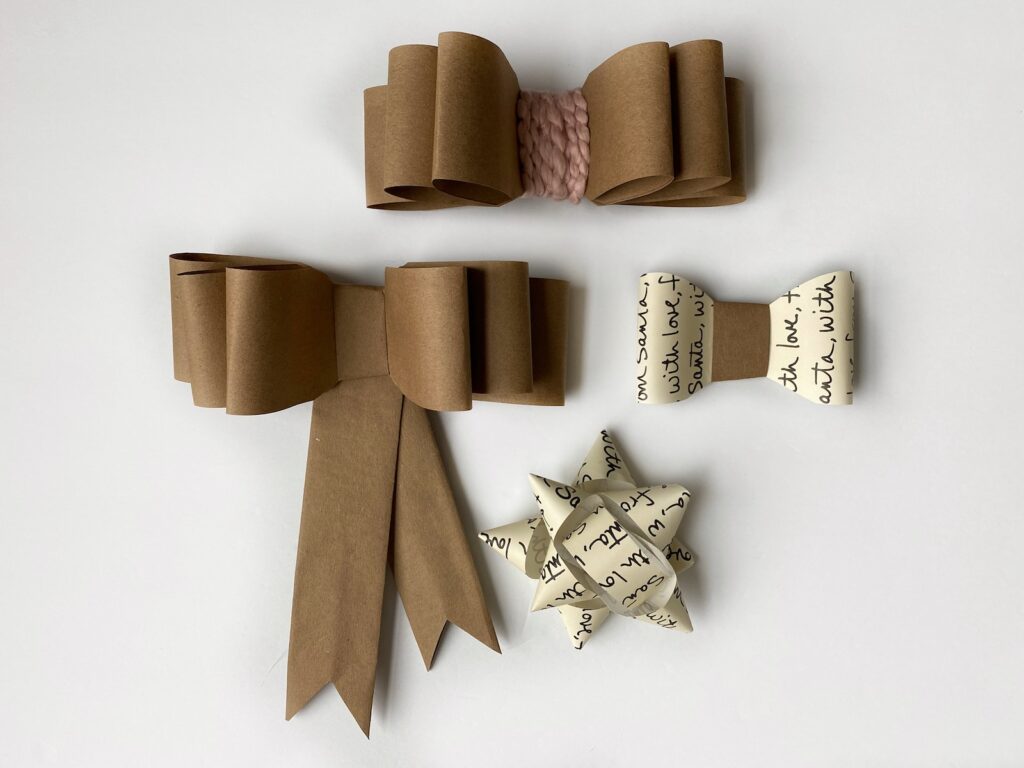
Of course, you can! One of the best things about making bows out of wrapping paper is the variety of styles you can create. For instance, you can make traditional bows that are simple yet effective. Or, if you’re feeling adventurous, try your hand at fringe or curly bows for a more elaborate look.
For those who love a bit of flair, curly bows can add a playful element to your gift. They’re especially great for kids’ presents or casual occasions. On the other hand, fringe bows bring a luxurious feel and are perfect for fancy events. The possibilities are endless, and the best part is that you can customize them to suit your taste.
How to Make a Bow Out of Wrapping Paper?
Alright, now let’s get into the nitty-gritty of how to make a bow out of wrapping paper. First things first, you’ll need to gather your materials. As mentioned earlier, thicker paper is preferable, but any leftover wrapping paper will do. Once you have your paper, follow these easy steps:
- Fold a piece of scrap wrapping paper in half to create a crease.
- Draw the bow template on the paper. You can find printable templates online or create your own.
- Cut out the bow template using scissors. Make sure to cut carefully to maintain the shape.
- Create the bow loops by folding the paper into loops and securing them with a piece of string or wire.
- Add the center of the bow. This could be a small circle of contrasting paper or even a decorative button.
- Make bow tails if desired. These are optional but can add a finishing touch to your bow.
What Tools Do I Need?
When it comes to making bows, the tools you need are pretty basic. A good pair of scissors is essential, as is something to secure the bow together, like a piece of string or wire. If you’re feeling fancy, you can add embellishments like glitter or stickers to make your bow pop.
One handy tip is to use a bone folder or the back of a spoon to smooth out the paper. This helps the loops hold their shape and gives your bow a professional finish. Of course, you can always adjust the tools based on what you have available. The key is to work with what you’ve got and make it work for you.
What Are Some Tips for Making Bows?
Now that you know the basics, here are a few tips to help you make the best bows possible. First, consider the size of your bow in relation to the gift. A bow that’s too small might get lost, while one that’s too large could overwhelm the present. Balancing the proportions is key.
Another tip is to play around with color combinations. Sometimes, contrasting colors can make a bow stand out, while complementary colors create a harmonious look. Also, don’t be afraid to experiment with textures. Mixing patterned paper with solid colors can add depth and interest to your bow.
What Are Common Mistakes to Avoid?
One common mistake people make when learning how to make a bow out of wrapping paper is using paper that’s too thin. Thin paper tends to flop and doesn’t hold its shape well. This can result in a bow that looks messy and unpolished. To avoid this, choose thicker paper whenever possible.
Another mistake is not securing the loops tightly enough. If the loops are loose, the bow can lose its shape over time. Make sure to tie the string or wire securely to keep everything in place. Lastly, don’t rush the process. Taking your time ensures that each loop is even and the bow looks neat and tidy.
Final Thoughts
Making bows out of wrapping paper is a fun and creative way to add a personal touch to your gifts. With just a few simple steps and a bit of creativity, you can create bows that are as unique as the people receiving them. Whether you’re making fluffy bows, classic bows, or something more elaborate, the possibilities are endless.
Remember, the key to making great bows is experimenting and having fun with the process. Don’t be afraid to try new things and see what works best for you. After all, the beauty of handmade bows is that they reflect your personality and creativity. So, grab your paper, scissors, and let your imagination run wild!

How To Make A Bow From Wrapping Paper at Pablo Lehmann blog

How to Make a Bow out of Wrapping Paper | How to make bows, Gift
How To Make A Bow Out Of Wrapping Paper 4 Easy Ways | Video Included
